Ontopic The 3D printing thread

ABS is just a dirty whore that loves to shrink and pull away from the bed. I haaaaate printing with it, and unless I've got a good reason to print with ABS (like, I'm making something that I'm solvent welding to ABS pipe) I go with PETG instead.

Using a brim helps. Especially with a print like the one you've got going there, which has sharp pointy corners where it'll likely break loose from the bed and cascade from there. Break the STL into two separate STLs and move them further apart from each other on the bed, so you can get more brim on the ends.

Enclosures help too, you can buy little 3D printer tents off amazon that seem pretty good. Creality makes an official one for the ender 3 etc.
That's true, I'm not sure why I'm not doing it with Alloy 910.

If this one bails, I'll probably do it with that instead. Current indoor humidity is 20%.
 
well. After getting through the tone wheel dildos, I might not ever use anything but ABS. Seriously, this Hatchbox ABS prints like silk.

Secret formula: a little more squish (.050mm) than PLA/PETG, PVA on the glass, and the ceiling fan on in "blow at the ceiling" mode.
 
 
Final product: https://www.thingiverse.com/thing:4827182

It's the first thing I made that's fully parameterized, so you can alter the part until it suits using the variables at the top of the file, and there's no magic numbers to deal with below the fold.

As is, it's setup for M4 hardware in both the holes and the clamping ring.
Very cool. Wish I could get going on 3-d, all I have is 2-d shit. The whole file sharing thing is awesome. Pappy could have used this - if he only knew how.
I can picture this idea of the file have parameters to dial the part in. FUcking 110%er. :lol:
 
Very cool. Wish I could get going on 3-d, all I have is 2-d shit. The whole file sharing thing is awesome. Pappy could have used this - if he only knew how.
I can picture this idea of the file have parameters to dial the part in. FUcking 110%er. :lol:
I wish I could wrap my brain around how to use the visual editors out there. I'm 100% stuck in source code/tippy-tappy-keyboard-warrior mode.
 
  • Haha
Reactions: wetwillie
I wish I could wrap my brain around how to use the visual editors out there. I'm 100% stuck in source code/tippy-tappy-keyboard-warrior mode.
I've switched to Fusion 360 for a good bit of the stuff I do. Teaching Tech bootstrapped me on it.

I still suck at it but there's a lot of things I really appreciate. Like just being able to click on shit and chamfer edges.
 
  • Gravy
Reactions: wetwillie
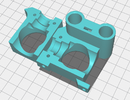
Currently printing on the Ultimaker at work: a new E3D V6 hotend holder for my MP Select Mini.

Didn't like what was available on thingiverse, designed one myself, took a couple hours in F360 to do.

mpsm_hotend.png
 
  • Gravy
Reactions: Jehannum
So, here's this part, it still needs some minor tweaking.

It has a little slide-in part on the bottom that bolts in to clamp and prevents it from slipping off. However, there's nothing to prevent it from sliding down the angled portion of the dash enough to fall off. Other than some rubber glued to the inside of the lips so it clamps and grips, I can't think of any way to prevent it from sliding down the bow cap's dash. Anyone got any ideas?


5ADu5eL.jpg


5o2F4Ct.jpg

Put a couple of feet coming out perpendicular to the main foot that rests against the dash, then put some rubber feet on 'em, and you should be donezo.
 
  • Gravy
Reactions: wetwillie
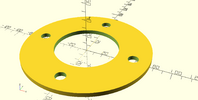
Printing one of these:
spacer.png

The swastikas don't clear the new front brake setup on the 240Z, so I need to figure out what size spacer is required. Since all the shit on Thingiverse is static and doesn't include source, I made a parameterized one.
 
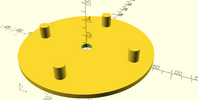
Oh, and since I'm also going to ghetto machine the spacers I ordered (nobody carries spacers for the front wheels of a 240Z), I doubled up and added a "jig" parameter to give me a pilot hole to center up a cutter on a drill press and pegs to go through the holes in the spacer.

jig.png

This is only safe because 240Zs are lug-centric and not hub-centric for wheel fitment.
 
these are just compressive passive "shims" right, they dont actually carry any load, torsional or otherwise?
 
I don't know what any of that means, but its still fucking cool.
hmm. Let me see if I can be clearer.

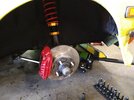
When I put these brakes on the Datsun:
IMG_20210529_112507076.jpg

The caliper sticks farther out toward the outside of the car than the previous one. That's an issue with one set of my wheels, because they hit the caliper.

So, I'm printing out a spacer that's basically a set of washers for the lugs, in order to figure how far I need to move the wheel away from the hub to clear the calipers (with the spacer between the hub and the wheel, it moves the entire thing out a little bit). My first try is 5mm.
 
  • Gravy
Reactions: fly